|
.png)
For accurate service scheduling it is vital that jobs are closed when complete and that accurate odometers are recorded.
Closing a job triggers update of the service schedule.
1. The Elements of a Scheduled Service Regime
A Scheduled Service Regime usually reflects the manufacturers service schedule.
The main elements of a Service Regime are:
•A Service Interval in km/hours (depending on clock type) and/or months with a service occurring at each e.g. every 10,000km/6 months, every 1000/or 3 months.
•A Service Kit for each service type e.g. Major/Minor or A/B/C/D etc.
•Parts and Requirements in each Kit which are added to the job automatically when the job is created.
There are reference files for each of these elements - parts, requirements, kits, regimes.
Additionally and optionally, each Kit can be given:
•Fixed costs which apply each time the Kit is used in a job.
•A flat or book time, used for comparing actual time to complete the service to the expected time.
Regimes can also be set to creep or not creep. More information on creep below.
Service Intervals can be by time only or time/utilisation.
.png)
|
Parts and Requirements are used to build a Kit for each type of service
|
|

|
|
Kits are added to a Regime with intervals (km/hours/months) to create a schedule
|
|
|
|
Regimes are applied to assets based on their Make Model Series
|
2. Cyclical Regimes
Service regimes are normally cyclical with the same services being used throughout the asset's life.
Examples:
Minor - Major - Minor - Major
A - B - C - D - A - B - C - D
A - B - A - B
1 - 2 - 3 - 1 - 2 - 3
In AusFleet, a Kit is created for each unique service, which is then reused each time the service reoccurs.
AusFleet numbers each service in the sequence, with "0" service representing the "once only" Warranty Service, which does not repeat
In this Regime, only 2 kits are required (assuming the warranty service is carried out by the dealer)
|
0 - Warranty Service
|
|
1 - Minor Service: Minor Service Kit
|
|
2 - Major Service: Major Service Kit
|
|
1 - Minor Service: Minor Service Kit
|
|
2 - Major Service: Major Service Kit
|
3. How Regimes are Attached to Assets and Controlled to Ensure the Correct Regime is Used
AusFleet controls which regimes can be allocated to assets to avoid human error in selecting regimes and thereby ensure that the correct regime is used.
The Regime for an asset is chosen in Fleet>>>MMSB Flags and Settings.
"No Regime" is always an option but means services will not be scheduled.
When Regimes have been completed they are assigned to Makes/Models/Series in the Regimes Reference File (More>>Reference Files>>Repair & Maintenance>>Service Regimes)
Depending how unique servce requirements are for particular asset types, a Regime can be assigned to:
•A Make - if all assets by the manufacturers have the same service requirements e.g. trailers, similar cars
•A Make/Model combination where there are common service types for each model that a manufacturer supplies E.g. Toyota Prado, Toyota Prius
•A Make/Model/Series combination where service requirements are different for each series in the model range
Body Type is ignored for the purpose of regimes.
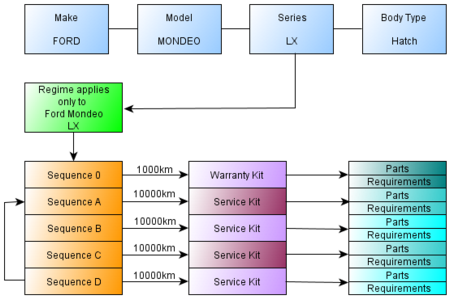
Example
For this Ford Mondeo the Regime is attached to the Series (LX).
This means that...
•If a Ford Mondeo LX is added to your database, AusFleet will only let you choose the LX Regime.
•If you add a Mondeo Ghia for example, there will be no regimes available to choose from.
If you also created a generic service regime and attached it to the Make "Ford", you could choose it for any Ford vehicle that does not have a closer match.
4. How to Create a Service Regime - Overview
It can take a little time to understand the process but long term the benefits can be enormous in terms of automation, accuracy and time saving.
Remember, the level of detail and number of regimes you require will be dictated by the diversity and type of assets in your fleet and your organisational requirements for record keeping, H&S policy, workflow etc.
See Repair & Maintenance Reference Files for detailed step by step instructions.
The approach is as follows:
|
1. Add Parts if they do not already exist in the database*
|
More>>Reference Files>>Repair & Maintenance>>Parts or Inventory module if installed
|
|
2. Add Requirements if they do not already exist in the database
|
More>>Reference Files>>Repair & Maintenance>>Requirements
|
|
3. Create Kits consisting of Parts and Requirements, one for each unique service type in the regime**
|
More>>Reference Files>>Repair & Maintenance>>Kits
|
|
4. Add Regimes with intervals (and flat rate times & fixed costs if required)
|
More>>Reference Files>>Repair & Maintenance>>Service Regimes
|
|
5. Add a Kit to each service in the Regime (kits may be reused if the parts/requirements are the same)
|
More>>Reference Files>>Repair & Maintenance>>Service Regimes
|
|
6. Assign the Regime to the applicable Make/Model/Series
|
More>>Reference Files>>Fleet>>Fleet Items>>MMS/Regime
|
* Parts are added to the Parts list in R&M Reference files or the Inventory module, depending on your licensed modules.
** In most regimes, the Kits will repeat e.g. major, minor, major, minor. Kits can be reused if the parts/requirements for the service are the same.
See also: Understanding Scheduled Service Regimes
Requirements./Parts/Kits/Regimes Reference Files
5. How AusFleet Manages the Service Schedule - The Service Matrix
Fleet>>Select Asset>>Service Matrix Tab
When an asset is added to the database, AusFleet creates the schedule based on the regime selected, from delivery to expected disposal date (which is one reason why expected life is a mandatory field).
If the asset is kept longer than expected, AusFleet adds extra forecast services each time the last one is closed.
•The Service Matrix is used by AusFleet to record past services and forecast future services (Fleet>>Service Matrix tab).
•The Service Matrix cannot be edited. The regimes and/or job details must be changed to make corrections/adjustments.
•It updates whenever the previous service job is closed, based on job date and odometer.
.png)
6. How are Service Due Dates Calculated?
As a guide, AusFleet performs the following process in working out the date the next service is due.
.png)
7. What is Service Creep?
Fleet>>MMSB Categories and Flags
Service Creep determines how the next service is scheduled for each asset.
7.1 Creep On
This is when the next service is scheduled from the actual date/odometer that the previous service was completed.
Creep is often applied to light fleet and similar items.
7.2 Creep Off
This is when the next service is scheduled from when the previous service should have been done, regardless of when the job should have been completed.
Non-creep is often used where warranty relies upon maintaining the manufacturers service schedule e.g. some plant items
Example:
An item has a service schedule of 1000, 2000, 3000...
The 1000 service was actually completed at 1200.
Next Service with Creep = 2200. Next service with No Creep = 2000.
Creep settings apply individually for time and utilisation based scheduling.
7.3 Default Creep Settings
Creep on/off can be set as a default for all items using More>>Parameters>>Default Settings>>778/780
This applies the chosen settings to all assets, which can then be changed for individual assets as required in Fleet>>MMSB Categories and Flags
This can help minimise data entry, especially where creep settings are the same for most assets.
7.4 Important Note When Creep is Off
If creep is off and service jobs are completed late and/or are not closed in a timely manner, the schedule can go "out of sync" where the same past date is forecast continually.
If this occurs, reset the service schedule for the asset by using the "Change Due Date" button for the next service date in the "Services Due" screen.
Resetting the service schedule
.png)
For accurate service scheduling it is vital that jobs are closed when complete and that accurate odometers are recorded.
Closing a job triggers update of the service schedule.
End of Chapter
|
.png)